Pages

Saturday, 29 September 2012

Jubilate Deo

Well, here it is.  The idea was to create a sense of space and height by having imagery of vaulted church ceilings at the top, music floating upwards and the angelic choir boys at the bottom.


I am disappointed that the ceilings have come out so dark - that was unexpected as they seem to be much lighter on paper.  I guess that's where you learn about checking how much toner is in the photo first...
I may work on this piece and try and knock back the heaviness at the top.

Hilary

Tuesday, 25 September 2012

Jubilation - what jubilation?

Oh dear, is this an idea or project that should never have seen the light of day?  Using the medium technique has meant I have the images transfered to the fabric - but what a mess and dismal result.   The toner is not completely fixed inspite of the paper being so dry it is crispy and curled (left overnight in the airing cupboard where the hot water tank is - lovely and warm and dry).  This means that in rubbing away the paper some of the image is taken off.   The paper was very wet and soggy.  It's looking a bit like a mural discovered at Herculaneum!


It is also interesting to see the transparency happening.  As this is a learning curve (steep one - why did I think I could just do this on the final piece?!!!) I am finding this fascinating and I'm sure if I carried on with this technique it would be very interesting to play with this aspect.  As it is I am ticking the box - tried it, done this, bought the T-shirt - now for something new...


The trouble is I still have to make a Jubilation piece.  I am going to take this piece a step further and either mess it up completely and rescue it.  At the moment it is a 'dog' and needs CPR.

What to do?  Quilt and then gently roller paint over? Use it as the background and work over the top ignoring what's there - very like an old master painting over a painting)?  screen print over? Stamp and stencil?  Just add more images?

Hilary


Sunday, 23 September 2012

"Best Of Show"

Belonging to the "12 By The Dozen" group has changed my life! Four years ago, I wanted my quilting to take a different turn and direction and to express myself using the medium that I am the most comfortable with: fabric and fiber. Being a member of this amazing group of like minded fiber artists from around the globe, has helped to inspire, encourage, and explore this new world for me. The quarterly challenges have not been easy but definitely  has enabled me to grow in my art that I never expected.

Last night, I was awarded "Best of Show" at our annual Houston Area Fiber Artists (HAFA) "Focus on Fiber" show exhibited at 18 Hands Gallery in Houston. The process started in August with meeting the "call" (deadline) and then waiting to hear if any of my three pieces that I entered were accepted...all three were accepted!  We were fortunate to have a very well respected local artist to jury and judge our pieces. As you can see, my winning entry was  "A View From a Venetian Gondola".  Even though it was small in size compared to other entries, the judge liked the variety of techniques that went into making this piece and the overall impact. I am still pinching myself to make sure that this isn't a dream!

I want to thank each and everyone one of you for your artistry, your generous sharing, comments and positive influence in my life and my art!

Dyeing Workshop

Well, as I have to wait for the Jubilation piece to dry I am using the time to catch up and post the promised photos from the wonderful recent workshop with Jan Myers-Newbury.  It was a 5 day workshop - 4 days dyeing and 1 day design, held in the fabulous Potters Barn which is Claire Benn's pride and joy and quite rightly so as she thought about every detail and has produced the perfect work space.

View of the end wall of the barn.
The workshop area.
There were ten of us and I knew one fellow CQer and knew of one of the other students.  Jan is a calm, extremely knowledgeable, encouraging and generous teacher.  The workshop ran smoothly because it was carefully planned and managed.  We all produced a substantial amount of dyed fabric which will be more than enough to keep us busy designing for quite a while.  I learnt a lot about the value of underpainting with dye - no soda in the dye or fabric - letting the fabric dry and then working with it (clamping, stitching, wrapping, etc) and dipping it into a dye bath with soda.  In fact I learnt a lot about the value of working on a piece of fabric through more than one or two stages.
Underpainted with 3 green stripes, then pole wrapped and dipped in brick red.


We clamped: wooden kebab sticks, coffee stirrers and tongue depressants (from dentist/doctor), empty celotape rolls, wooden coving and  kid's plastic train tracks - were some of the strange but very effective resist items used.
Kebab sticks between folded layers, carved erasers clamped
We pole wrapped:  first without using any string, but folding and wrapping different ways and angles.  The fabric was held in place top and bottom with elastic bands.  Then we used string, thick, thin, hairy - you name it.  I did one piece where the string went on very haphazardly and the results were brilliant.
Rope, poles and kebab sticks tied and ready to dye - most for the second time

Poles wrapped without string ready to dye
 We wrapped around very thick rope.
The wonderful effects of thick rope wrapping
Two of my best pieces were first stitched into tubes on a machine, one with darts in and the other with folds made as I wrapped it around the pole.

Tucks sewn in then wrapped
Folds added during wrapping
Here's my pin board with a couple of day's work, mostly with just one dyeing process, though the one with circles was underpainted as was the top left hand corner piece.
Part of 2 days worth of dyeing
The two dark pieces in the lower right corner were first clamped and dyed, then stitched in various ways and dyed in midnight blue.  Here they are ready to go in the dye bucket.


After 4 days of dyeing, we then had plenty to work with thinking about how we could use them.

First attempt - needs lost more work...
Piece by Jan using my fabric. 
Marks were made by the elastic bands holding the wrapped fabric on the pole top and bottom.


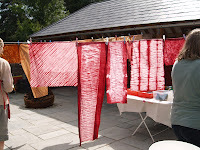
 And as a treat some photos of the washing lines to end with...            Hilary


Those wonderful marks made by plastic construction toy pieces.

Jubilation - or rather a lack of jubilation

I haven't forgotten my contribution to the last theme but it has been one of those occasions where Plan A  wasn't meant to be.  Having cleared my desk after the Festival of Quilts I was longing to start on the idea I have had almost from the beginning.

I took advice from Heather and Michele on how to transfer images to paper or fabric using acetone.  From the beginning I knew I couldn't use my inkjet printer so dashed into the nearest town to the print shop - only to find it isn't open on a Saturday.  Drat!

Monday morning I dashed down and although they don't have a laser copier it is one that uses toner - should be OK.  I then discover that nail polish remover is acetone but has additives and doesn't work.  Dash out and discover that the local hardware shop doesn't sell pure acetone and I need to go back to the chemist where I have just been.  See what I mean about Plan A being doomed?

Right, now I have toner copies and 100% acetone.  Will it work?  NO!  I have no idea why not.  I am using Tissutex (Abaca paper) - whether that is the problem I don't know and I will not find out because I have given up on this method.  Michele, you pieces are exquisite but I have no idea how you do it.

Project scraps

So, here I am doing Plan B which was something I really hoped I wouldn't have to resort to - using gel medium.  And it is working!  Because I have a slightly complicated, layered collage in mind it is taking longer to do because of having to wait in between the layers for everything to dry twice - once for the medium to dry and then for the damp fabric after I've rubbed off the paper.

Fingers crossed it is going to plan - so far.  I am cautiously optimistic.  Watch this space...

Hilary


Sunday, 9 September 2012

Jump for Joy

What can be more jubilant than a youngster jumping off a rock into a lake at the cottage on a hot summer's day.  I've used hand dyed, shibori, rust on silk, stamped, glued....  By the way, this is the view of my neighbour's shoreline and her granddaughter seen whilst standing on my dock.  


Wednesday, 5 September 2012

Demo of Michele at work

Those of you who are intrigued by the techniques Michele uses to produce her beautiful layered pieces may want to have a look at my blog. Today I posted a few photos and some text to explain her processes.


Sunday, 2 September 2012

Saturday, 1 September 2012

Next theme

Hi everyone,

I have so much to pass on after the dyeing workshop with Jan Myers-Newbury and will get around to posting .  Suffice to say, it was magic!

Meantime, I am bowled over by all your beautiful interpretations of Jubilation.  I will get around to making mine asap - the design has been in my head for a while.  I will also find time over the next few days to comments on the last submissions.

So, the theme is.....................THREADS.

Have fun,

Hilary